
Presentation to the Technology Institute For Music Educators conference April 10th, 2002
by Tom
Zicarelli - Gould Academy, Bethel, Maine
email: zicarelt@gouldacademy.org
abstract
The combination of Visual Basic and a MIDI enabled computer
soundcard provides an inexpensive way for students to learn the principles
of electronic instrument design, computer programming, and algorithmic
composition. Students use a set of preprogrammed MIDI software modules to
design instruments on the computer screen. For example, the coordinates of
mouse movements can be translated, using MIDI messages, into music. Using
common household materials, students can build sensors to extend and
transform these software-based instruments into real interactive
instruments.
The projects described here were built by high school students in my computer programming and music technology classes during the past two years. You won't find any technological breakthroughs or earth shattering discoveries here. But you will find some concepts, not generally taught at the high school level. And if you're interested in MIDI (Musical Instrument Digital Interface) and audio programming in Visual Basic, this is an excellent place to start.
This presentation is in two parts:
software - designing Visual Basic programs that use MIDI and audio data
hardware - Building interactive MIDI devices
The general idea behind these programs is to give the student a framework of a program, that they can modify and enhance. Its a jump-start, that allows them to begin with a working system. Its the same approach used in the computer industry to train entry level programmers.
If you're put off by jargon, or have no intention to try any of these programs, you may want to click here to skip this section
Disclaimer: Remember, you get what you pay for - so please don't expect this code to be flawless. Some are student programs. Others are works in progress. MIDI and audio programs can be fussy about external devices, sound cards, and operating systems.
These instruments were designed using Microsoft Visual Basic 6.0. (VB) The first programs use direct API calls to send and receive MIDI messages. Here is a link to the Microsoft Knowledge Base that provides sample visual basic code to control MIDI devices:
All of our current programming efforts use the Mabry Visual Basic MIDI IO controls, which are now publicly available freeware. You may download them, along with many other useful utilities, from:
The last group of programs uses the Microsoft Direct-X library to work with audio. To use the Mabry controls, simply copy the two ocx32 (control files) to the c:\windows\system directory. Then, from Visual Basic, select project | components, and browse for the each of the new control files.
If you do not have Visual Basic 6.0 on your computer, you will need to install Visual Basic runtime files on your system. Here is the link to get instructions and files (free) from Microsoft:
Here are some helpful notes that explain how to work with MIDI API calls from within Visual Basic. This is the hard way! But these notes will give you a basic idea of how MIDI works:
Midi input (ms word doc)
Translating Mouse Movements to MIDI (ms word doc)
MIDI programs, controllers, and channels (ms word doc)
Writing Procedures to simplify MIDI output (ms word doc)
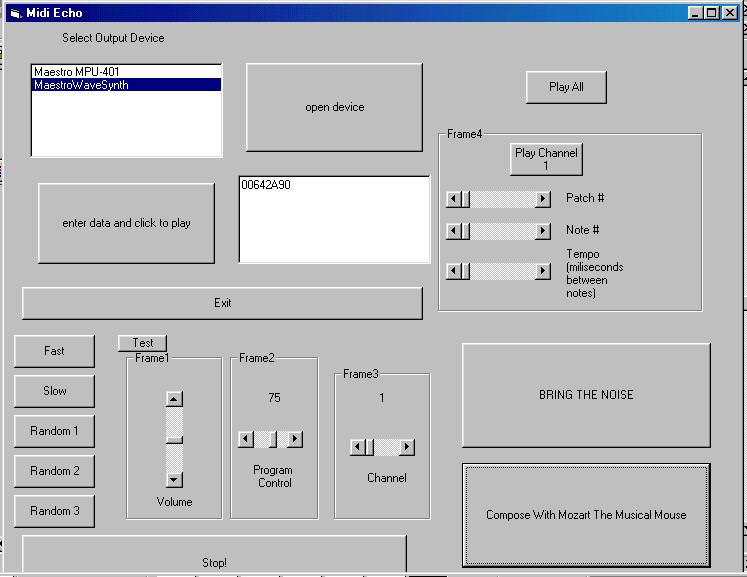
This program demonstrates simple MIDI IO using the Mabry controls, and will provide a good starting point for any MIDI project. This program also demonstrates an inverted keyboard, and a modulation wheel that plays notes.
This program is an example of using direct API calls to generate MIDI messages. It features:
Here are the files:
screen shot of drawing music with the mouse in Kiesel's program
screen shot of the main form of Kiesel's program
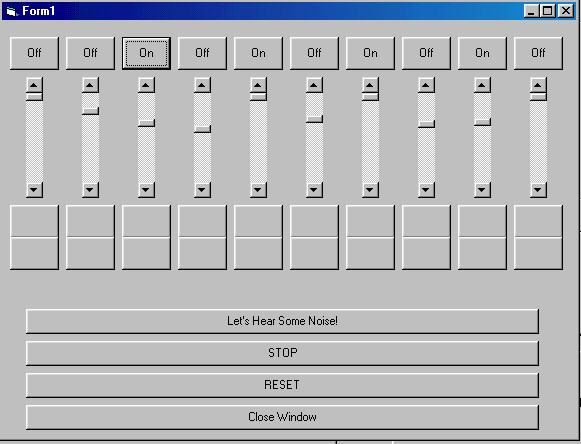
screen shot of the drum machine in Kiesel's program
Yes, I know that arpeggiator is not really a word. These controls allow even more flexibility, especially when working with MIDI input. This program reads MIDI notes from an input device, like a MIDI keyboard, and generates arpeggios based on several algorithms. The user can adjust the speed and note interval. It also features a grid that allows the user to set up arpeggios with various beat patterns - and load/save the patterns. But Ryan describes it better himself in his web page. Here are the files. Note - this program requires the Mabry MIDI IO controls (see above).
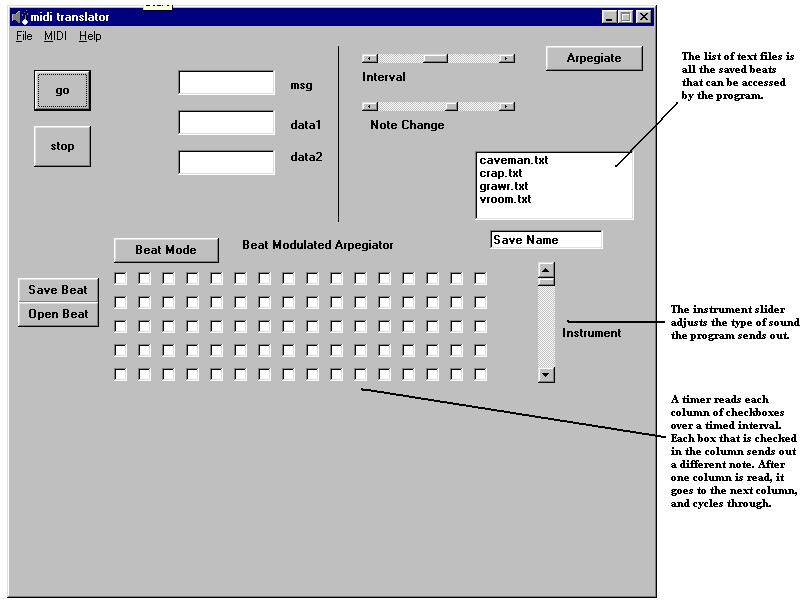
screen shot of Linn's Beat Modulated Arpeggiator
This project was attempted by two students. In both cases they were able to get the client-server communication running, but ran out of time and did not complete the MIDI implementation.
Here is a version that actually works! It uses the Winsock control, to build a client-server system which sends midi data from one computer to another, over the Internet. In this implementation, the input controller is connected to the client, which sends MIDI data to server, where it is played on a MIDI output device. It requires the Mabry MIDI IO controls (see above).
This program uses Direct-X audio, combined with the MIDI techniques demonstrated in the above programs to create a primitive sample playback engine. It loads wave files and allows you to play them from a MIDI keyboard - to a certain extent. It is a work in progress. It may not function with your particular system. I had some trouble triggering the sampler using the TTS virtual piano device from cakewalk on windows98. But at any rate, there is enough code here to confuse the living daylights out of you for a few minutes. It requires the Mabry IO controls (see above).
Here's another work in progress. Its a simple MIDI pattern sequencer (drum machine). Requires Mabry IO controls. Also uses Mabry high resolution timer, which is not freeware, but you can just replace the timer controls with the standard VB timer controls.
These projects combine basic electronics, MIDI, and a bit of imagination.
During May 2001, Scott Kiesel and Caleb Desmond built a musical staircase, based on the model in the Boston Museum of Science. Due to a complete oversight on my part, no photographs or recordings were made of the project. But I can assure you the young faculty kids loved to climb on it.
Unlike the the photo-electric system at the Museum of Science, our staircase was made of foam rubber, aluminum foil, duct tape, Ethernet cable, and a hacked Radio Shack MIDI keyboard. The MIDI output was fed into a laptop computer running Visual Basic programs, designed by Scott and Caleb, that read and displayed the data stream before passing it on to a synthesizer module.
It is relatively easy to build sensor to trigger MIDI data. One of the least expensive approaches is to modify a MIDI keyboard, attaching wires to the key contact circuits. We tried this approach with a Radio Shack keyboard (shown below) and It has proven to be very reliable. To find where to attach the wires, just press keys and touch the leads of an ohm-meter to various points on the keyboard circuit board until you find something that responds.
Unfortunately I got carried away and damaged the actual keyboard in the process, so you can't play it, except through the external wires, but such is life. This keyboard is usually on sale at Radio Shack for around fifty or sixty dollars:
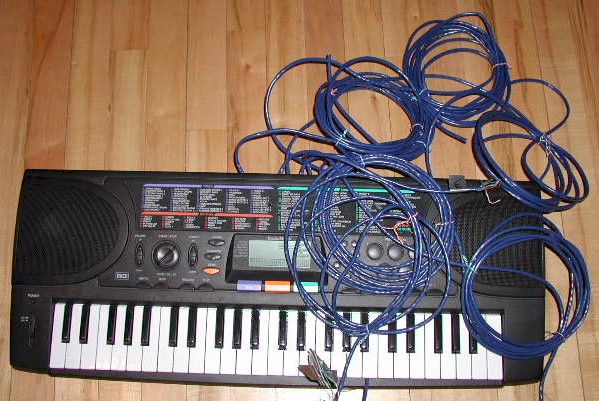
Radio Shack MIDI keyboard with Ethernet cables that switch on the keys. One cable contains the master contact for each group of 6 notes. Notes are triggered by touching the wires from the other cables to one of the note group wires in the master cable. Hmmmm... would you repeat that please?
These sensors were used in conjunction with the radio shack keyboard to build the musical staircase. The basic idea, as explained elsewhere on the Internet, is to sandwich a piece of foam with holes in it, between two pieces of aluminum foil. When you press on the top of it, the aluminum foil touches through the holes in the foam. When you let go, it breaks the connection. by connecting wires to the top and bottom layer of foil, you will have a momentary SPST pressure activated switch.
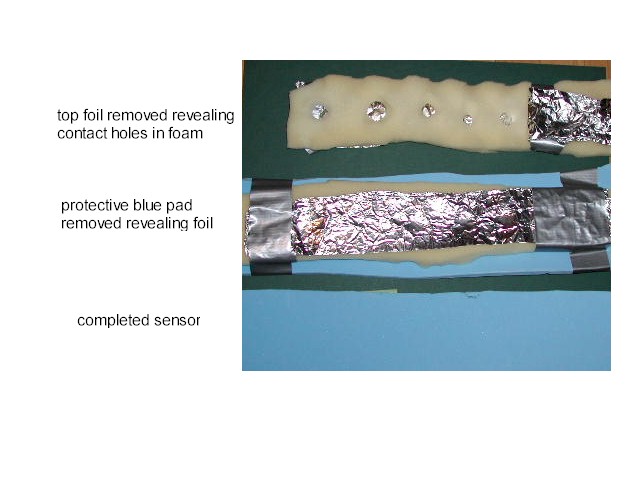
homebrewed foam-and-aluminum-foil SPST pressure activated switch. Just tape the connecting wires to the top and bottom layers of foil.
The basic MIDI IO program described above was modified slightly and used as monitor for the the staircase. As each sensor was triggered, the MIDI data was displayed on the screen.
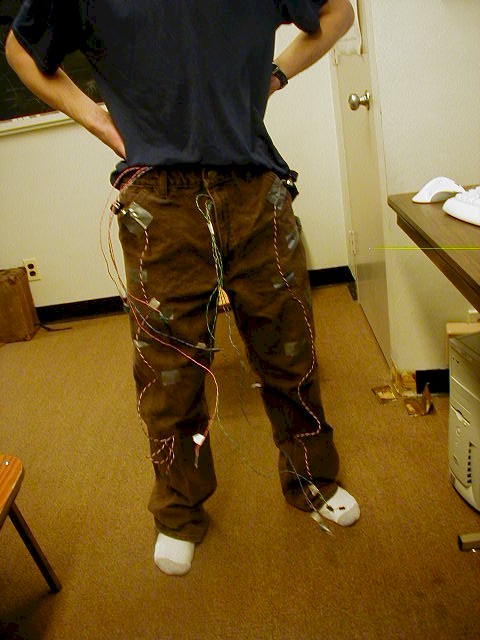
Along the same lines as the staircase sensors (explained above), Ryan Linn constructed miniature pressure activated switches using pennies and foam - and built them into a pair of pants.
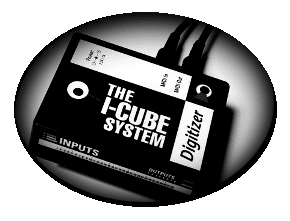
These sensors were connected to a device called the iCUBE, built by Infusion Systems. It is somewhat more compact but less inexpensive than the Radio Shack keyboard hack method. The iCUBE also works in reverse, allowing you to translate midi message into analog electrical impulses.
In the musical pants the iCube uses midi signals to send input from various sensors to and from the computer. There are many types of sensors such as turn-dials, light sensors, motion sensors, touch sensors, buttons, etc. These sensors send signals to the icube which interprets the signals and sends them to the computer to do random things (change volume, play musical notes, take over the world).
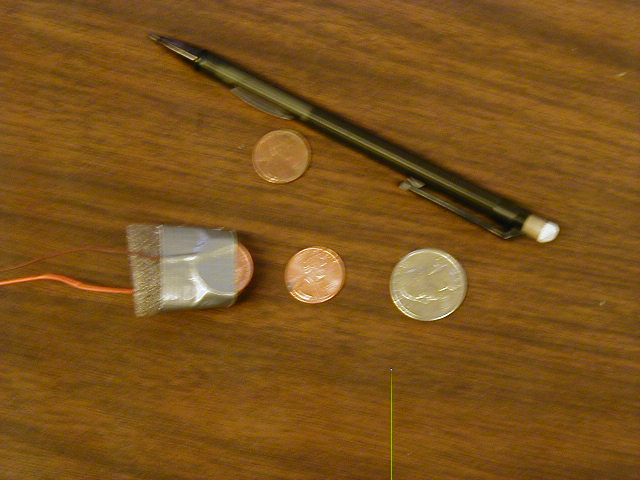
The pants use two types of sensors so far, but more will be incorporated later. The first is the turn-dial, which is used to control the volume of the notes played with the pants. There are two turn-dials, one for each leg. Also on each leg are four custom-made-penny-sensors. The penny sensors are nothing more than a pair of pennies separated by foam insulation, and each hooked up to a wire. When the pennies are touching they complete an electric circuit and send an "on" signal to the iCube. These are used to play musical notes
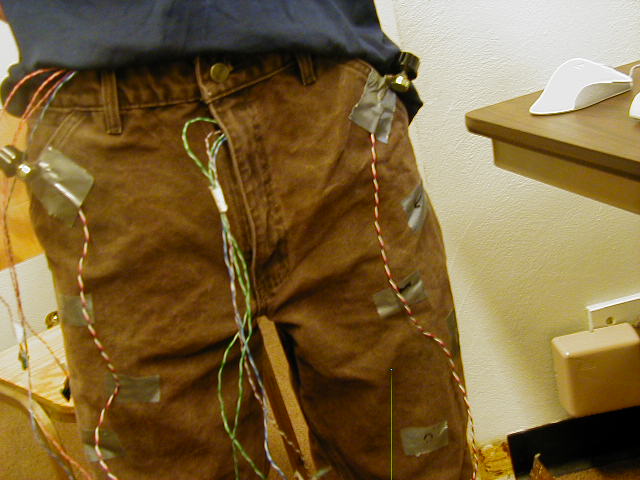
The musical pants have four penny sensors in each thigh (from the knee up to the hip), and one turn dial on each hip. Wires from the sensors go to the iCube, which is fastened to the pants at some point. The pants are not very mobile, because the iCube must be plugged into a computer to work. Once everything is set up correctly, whoever is in Ryan's musical pants can play notes from one instrument by hitting the sensors on one leg, and another instrument by hitting the other leg. The turn-dials can be adjusted so each instrument has a different volume. It works best when the volume is set above zero. Usually.
Click here to read more about the musical pants.
Click here to view a live performance of the pants
We have three projects currently in the works.
Recently the ancient lighting controller board in our school's auditorium was replaced, due to safety issues. We noticed that the new board has MIDI input jacks. This spring we hope to build a system, using the foam and foil sensors from the musical staircase, that will trigger music and light, when people dance on it.

With the assistance of Nance Cummings, students recently built a life-size wooden moose. We'd like to place sensors in close proximity to the moose that will allow it to converse with people that approach it. The sample playback software (above) would be set up to play a different voice sample for each midi sensor.
MIDI lends itself well to applications that require precise timing. By reading the timestamp on incoming MIDI data, we plan to build a game show lockout system - along the same lines as Jeopardy (tm). As well as using sensors for response buttons, MIDI will be used to generate the sounds - buzzers, bells, etc.,